Data protection is something you probably wouldn’t think about until you happen to face a data loss episode. My family suffered for a bit when a 4 TB HDD failed on us, wiping away years of memories. Anyone who has lost data as important as that also knows the pain that comes with it, so it’s all the more important for you to safeguard your data and keep it safe.
To this end, you may have heard of the 3-2-1 backup strategy before: It’s a pretty solid foundation for making sure your data stays safe by duplication — by keeping multiple copies of your data in different places, it ensures that not all data is lost if one place so happens to lose it. It tells you to store your data with:
- three copies;
- on two different media;
- with one copy off-site.
By making use of this system, we can rest assured knowing copies of our data are available at any time, and we can tap into them as we see fit.
But if you’re a student like me, things can get (a) pretty costly, and (b) pretty complicated. What if you can’t afford additional hard drives or SSDs, or need to find a way to make sure all your copies remain up to date? What if you can’t afford subscriptions for backup services, like Backblaze? That’s the little challenge statement that I took up recently: can we make a system that works for us without breaking the bank?
What I have now might feel patchy, but I think it works well enough such that there isn’t the need to meddle much with it. And since we know what we’re doing1, we can tweak anything to our liking.
The ingredients you’ll need
- Syncthing is a nifty file syncing program that allows you to synchronise files and directories across multiple client devices.
- Rclone is a helpful program for managing files on cloud storage.
The concept is somewhat simple: you install the Syncthing client on each device you’d like to connect, tell Syncthing about the files or directories you’d like to sync, then connect the clients together using device IDs. Syncthing will handle the rest, including conflicts2. Each device will have a copy of your data.
We’ll use Rclone for syncing a local directory that we have to a cloud provider, like Google Drive. Rclone supports encryption, such that whatever gets backed up to the provider is an encrypted, jumbled mess. Rclone can decrypt it with the right password(s). That sounds like a win-win in privacy, especially if you’re concerned about the cloud provider getting its hands on your raw files and directories.
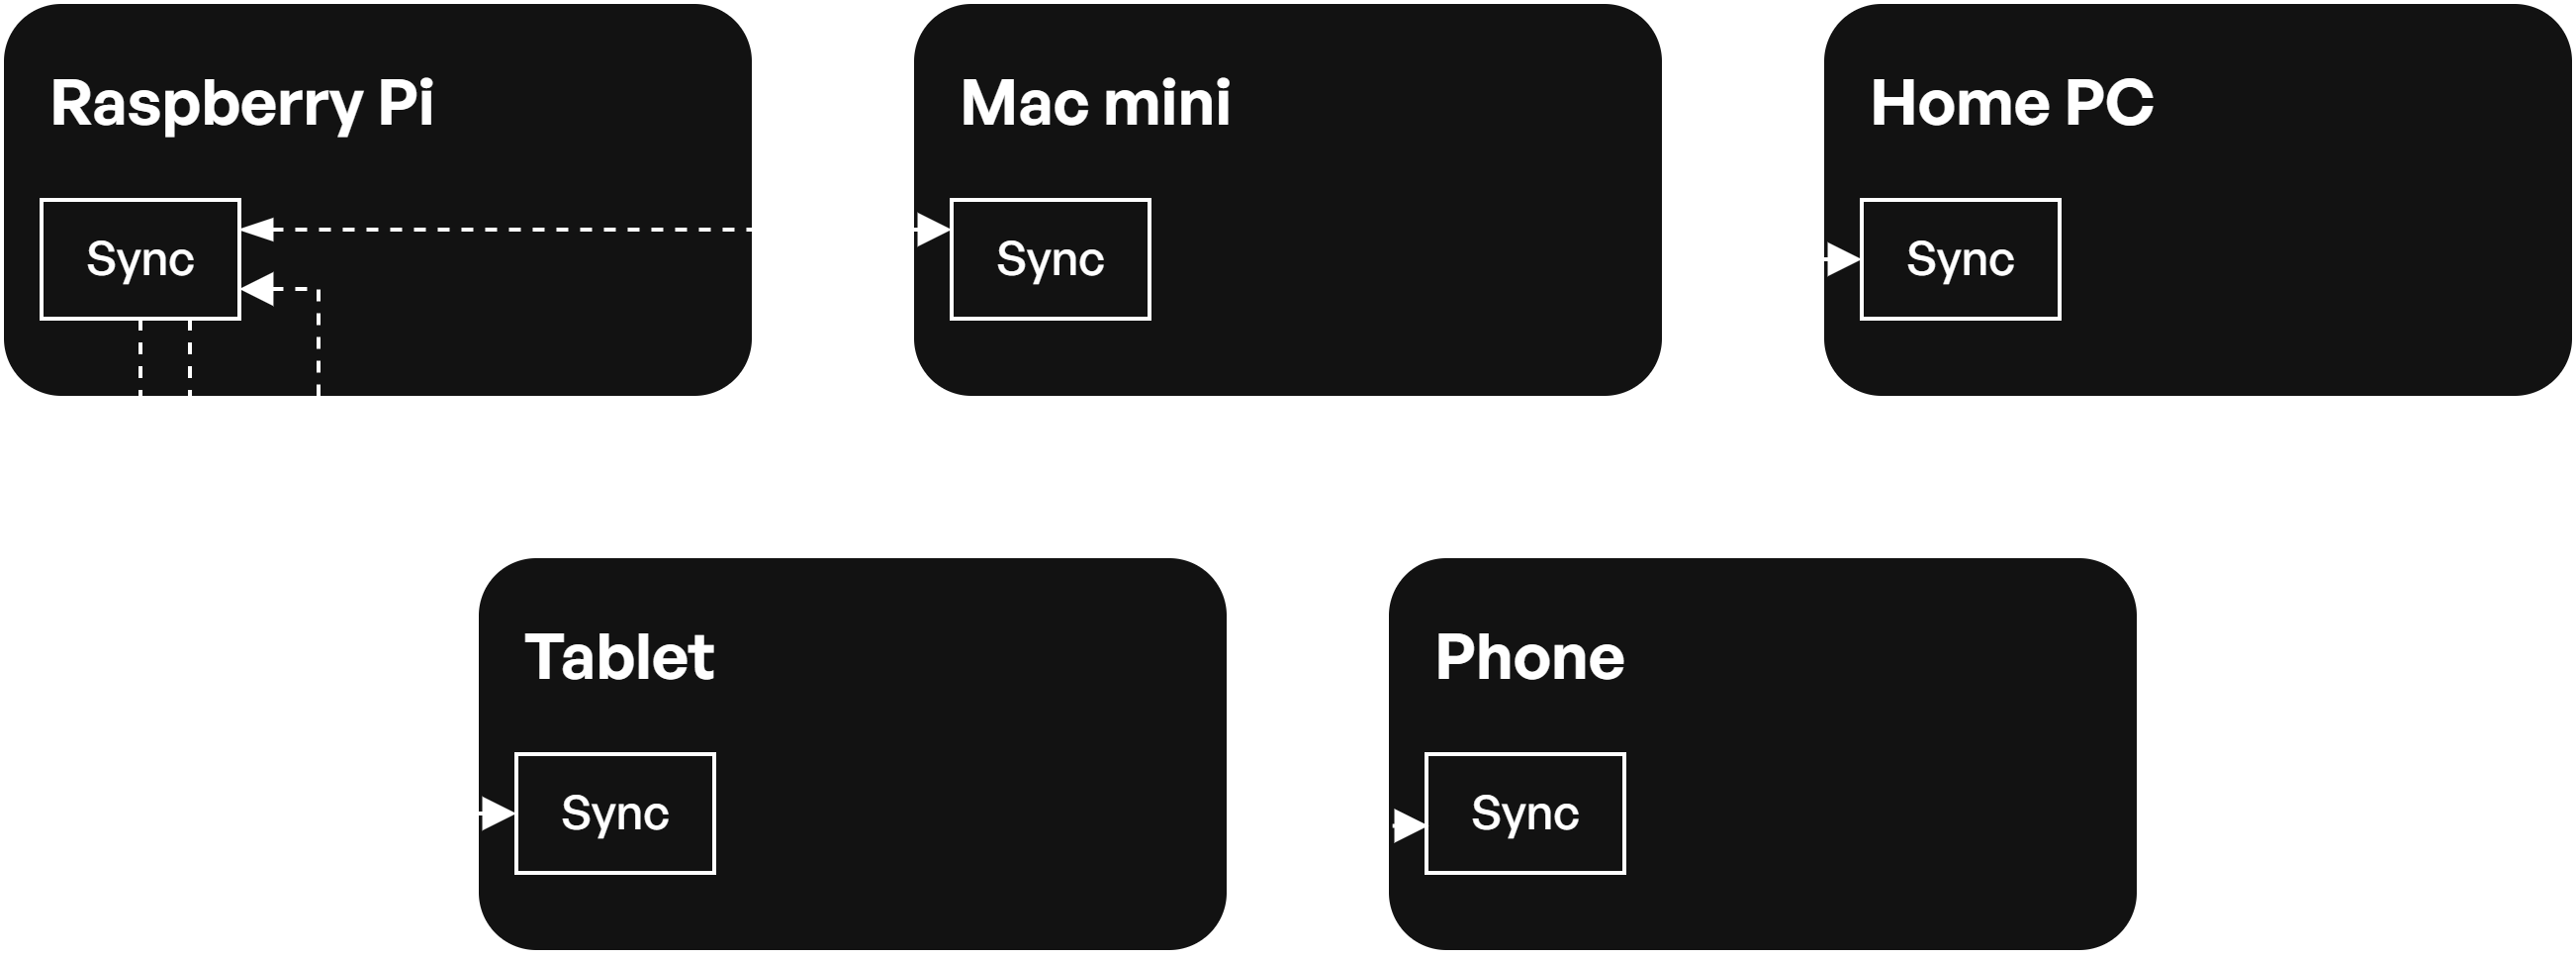
The game plan is this: we’ll use Syncthing to duplicate a single directory across multiple devices. Let’s say you have a folder named Sync, and you have a Raspberry Pi, your desktop PC, and your phone. You can use Syncthing to make sure there are copies of Sync across all three devices, and Syncthing will ensure that all the devices’ copies of Sync are up to date.
Next up, imagine that Sync is stored on an HDD connected to the Raspberry Pi. We can then use Rclone to create another copy of Sync and store it in, say, Google Drive. That way, we’re meeting the criteria of the 3-2-1 backup strategy; we have our data stored in at least three places (our devices + Google Drive), on at least two forms of media (a hard drive and cloud storage), and at least one off-site location (cloud storage).
Getting started
Syncthing shenanigans
Syncthing is a great foundation because it recreates your data across your many devices. The more devices you add into the mix, the more copies of your own data you’ll have.
Heads up!
Syncthing really does mean duplication in the literal sense — so if you drop a 16 GB file in a shared directory, every device will get its own 16 GB copy of said file. Make sure your devices have storage aplenty!
What we’ll do for Syncthing is to:
- Install Syncthing on each device
- Link the devices together
- Configure the directories to share between the devices
Installing Syncthing on each device
To get things started off, go ahead and download Syncthing for each device you’d like to store the data. For me, I had Syncthing installed in almost, if not all, of my devices, including:
- Two computers — my Mac mini and desktop PC at home;
- My portable devices — my tablet and phone;
- My scrappy home server for now: my Raspberry Pi.
As mentioned before, I have an HDD attached via USB to my Raspberry Pi that I use to store stuff. 1 TB can store a lot of stuff!
Especially with my Tailscale setup, I can easily tap into the web GUIs for the different Syncthing instances across all my devices. Once they’re all connected to the same tailnet, I can just do http://pi:8384 and I’ve landed at my Pi’s Syncthing instance. That makes it a lot easier to set things up.
Linking the devices together
The next step would be to connect the devices together on Syncthing. You can have a look at Syncthing’s documentation to do this, but the TL;DR version of it would be to obtain the device ID of each device, then use that in the Add Device wizard to link two devices together. If all your devices are in the same network, Syncthing can automatically find other running Syncthing instances. Remember to name your devices well!
Configuring shared directories
Next, you’ll need to configure the directories that you’d like to sync between your devices. On the device with the directory you’d like to share, add it to Syncthing and select the devices you’d like to share it with. On the other devices, accept the share invitation. Syncthing will handle the rest, making sure that the data is copied between the devices. Pretty nifty and neat!
Syncthing is flexible enough to support both one-way and two-way syncs, meaning you can configure it such that every instance syncs with each other (a peer-to-peer system!), or centralise things by having all devices sync to only a single instance. You just have to pick which devices share a directory with which.
Rclone
If you’d like to stop here, you technically can. You’ve achieved most of the 3-2-1 backup strategy, and if you’re on the move, you technically have a copy of your data stored off-site (always moving with you!). But imagine if the worst happens: your house burns down, your phone gets lost at sea while on vacation — what happens next?
That’s where Rclone comes in; it now brings cloud providers into the mix, guaranteeing the safety of your data. It’s slightly harder to set up than Syncthing, but don’t worry too much! Here’s what we’ll do:
- Install Rclone
- Add your cloud providers to Rclone
- Configure encryption (optional!)
- Perform your first sync
Installing Rclone
Rclone is a CLI program; go ahead and install it on your system. I installed this on my Raspberry Pi since the “main source” of data is stored there, on the HDD connected via USB.
Adding your providers to Rclone
The next step is to configure Rclone, telling it about the cloud providers you’d like to connect it to. Thankfully, this is (usually) a one-time process; if you move to another device, for example, you can simply securely copy over the config file so that you won’t have to set everything up again. Feel free to have a look at Rclone’s documentation, but running rclone config should present you with a rather human-friendly interactive that you can follow the instructions to set things up.
- For example, if you’re using Google Drive, just enter
22in the new remote wizard and follow the steps. I followed the documentation to create my own client ID using Google Cloud, but that’s an optional step if you’re alright with slower or rate-limited syncing.
Configuring encryption
What I did next was also to set up a crypt so that I could sync encrypted data to Google Drive. The doc on crypt was a little confusing — it took me a while to realise that you need to create a new remote with the crypt type (number 15 in the new remote wizard). You’ll need the name of the existing remote provider (in my case, drive:) to set it up. Moving forward, you can use this remote instead of your Google Drive remote, and Rclone will handle the encryption!
Pro tip:
If your Drive remote points to the root (drive:), Rclone can see everything
in your Drive. When creating the crypt remote, you can instead point it to a
subfolder within your Drive (e.g. drive:/Homelab/Backup). When you then run
rclone sync, your encrypted files will go neatly into /Home/Backup instead
of cluttering the root.
That’s all you need to do for the config. To sync, just tell Rclone what you’d like to sync, and to which remote and where within said remote. The syntax looks a bit like this:
rclone sync [source] [remote]:[path]My final command was:
rclone sync -v /mnt/... crypt:…which tells Rclone to sync /mnt/... to the crypt remote at the base directory (configured to be drive:/Homelab/Backup). -v is a flag that makes the program verbose, spitting out more information so that I can see what’s happening more clearly.
If you’re using the bash shell, you may be familiar with the .bash_aliases file — it allows you to create shortcuts or abbreviations for longer commands, making it easier for you to call them. Since we’re calling Rclone pretty frequently, you may want to consider creating an alias within that file to easily call whenever you’d like to sync your local directory to the cloud:
alias backup-hdd="rclone sync -v /mnt/... crypt:"Another nugget of knowledge: automating and scheduling the running of commands. cron jobs are perfect for this, allowing you to schedule a job that runs a command at a specified time period using cron schedule expressions. You can automagically sync by scheduling a job:
crontab -e0 0 * * 0 rclone sync -v /mnt/... crypt:To wrap things up…
What you’re doing here is making use of existing services (Syncthing and Rclone) to duplicate and synchronise data, such that copies of it will always exist in more than one place and in a way that is up to date. This is your 3-2-1 strategy: by using Syncthing to duplicate data across your devices and Rclone to tap into cloud storage, you’re all set to go.
I haven’t exclusively run a performance test to see if this arrangement makes a dent in performance in the different devices, but empirically, there hasn’t been any issue in any of my devices. Nothing has been running too slow, even for the power-efficient Raspberry Pi, so I’m happy with how things are right now.
And remember, as you expand your knowledge in data protection and backing up, you can continue playing around with this system to fit your own needs. This system works if you have multiple devices and need something that works quickly and easily. With Rclone, you can later add on even more cloud providers, too — all up to you!
Best of luck with your data protection journey: it’s only just begun!
Footnotes
-
I sure hope you aren’t following a guide by other random strangers on the Internet without scrutiny… ↩
-
You can read more in this forum post about how Syncthing handles conflicts. ↩